Complete Documentation
Welcome to the official documentation for Restaurant POS Lite - your complete restaurant management solution for WordPress.
Introduction
Restaurant POS Lite is a comprehensive, feature-rich restaurant management system designed specifically for WordPress. It provides a complete solution for restaurants, cafes, food trucks, and any food service business to manage their operations efficiently from a single WordPress dashboard.
The plugin offers a modern Point of Sale (POS) system, inventory management, customer relationship management (CRM), sales tracking, accounting, and detailed reporting - all integrated seamlessly into your WordPress admin area.
Dashboard Overview – Main admin dashboard displaying key business metrics and summaries
Key Benefits
- Complete Restaurant Management: Everything you need in one place
- Easy to Use: Intuitive interface designed for busy restaurant environments
- Real-time Operations: Live inventory updates and sales processing
- Professional Reporting: Comprehensive sales and financial reports
- Cost-effective: Free solution with premium features
- WordPress Integration: Seamless integration with your existing WordPress site
Installation
Installing Restaurant POS Lite is simple and straightforward. Follow these steps to get started:
Method 1: WordPress Admin (Recommended)
- Log in to your WordPress admin dashboard
- Navigate to Plugins → Add New
- Search for "Obydullah Restaurant POS Lite"
- Click Install Now next to the plugin
- After installation, click Activate
Method 2: Manual Upload
- Download the plugin ZIP file from WordPress.org
- Go to Plugins → Add New → Upload Plugin
- Click Choose File and select the downloaded ZIP file
- Click Install Now
- Click Activate Plugin after installation
Database Setup
Upon activation, the plugin automatically creates the necessary database tables. You'll see a success message confirming the setup.
- orpl_categories (Product categories)
- orpl_products (Menu items)
- orpl_stocks (Inventory)
- orpl_customers (Customer database)
- orpl_sales (Sales records)
- orpl_sale_details (Sale line items)
- orpl_accounting (Financial records)
System Requirements
To ensure optimal performance, your server should meet these minimum requirements:
| Component | Minimum Requirement | Recommended |
|---|---|---|
| WordPress | 5.0 or higher | 6.0 or higher |
| PHP Version | 7.4 or higher | 8.0 or higher |
| MySQL | 5.6 or higher | 5.7 or higher |
| Memory Limit | 128MB | 256MB or higher |
| Browser | Chrome 60+, Firefox 55+ | Latest Chrome/Firefox |
Quick Start Guide
Follow this quick setup guide to get your restaurant POS running in minutes:
Step 1: Configure Settings
- Go to OBY Restaurant POS → Settings
- Enter your shop information (name, address, phone)
- Set your currency and tax/VAT rates
- Configure date format and other preferences
- Click Save Settings
Settings Panel – Configure taxes, receipts, and system preferences
Step 2: Create Categories
- Go to OBY Restaurant POS → Categories
- Add your menu categories (e.g., Appetizers, Main Course, Desserts)
- Set status to "Active" for visible categories
Product Categories – Create and manage product categories for better menu organization
Step 3: Add Products
- Go to OBY Restaurant POS → Products
- Add your menu items with names and categories
- Upload product images for better visual appeal
Product Management – Add, edit, and organize menu items with categories
Step 4: Manage Stock
- Go to OBY Restaurant POS → Stocks
- Add initial stock quantities for your products
- Set buy price and sale prices
Stock Management – Monitor product stock levels and inventory availability
Step 5: Start Taking Orders
You're now ready to use the POS system! Go to OBY Restaurant POS → POS and start processing orders.
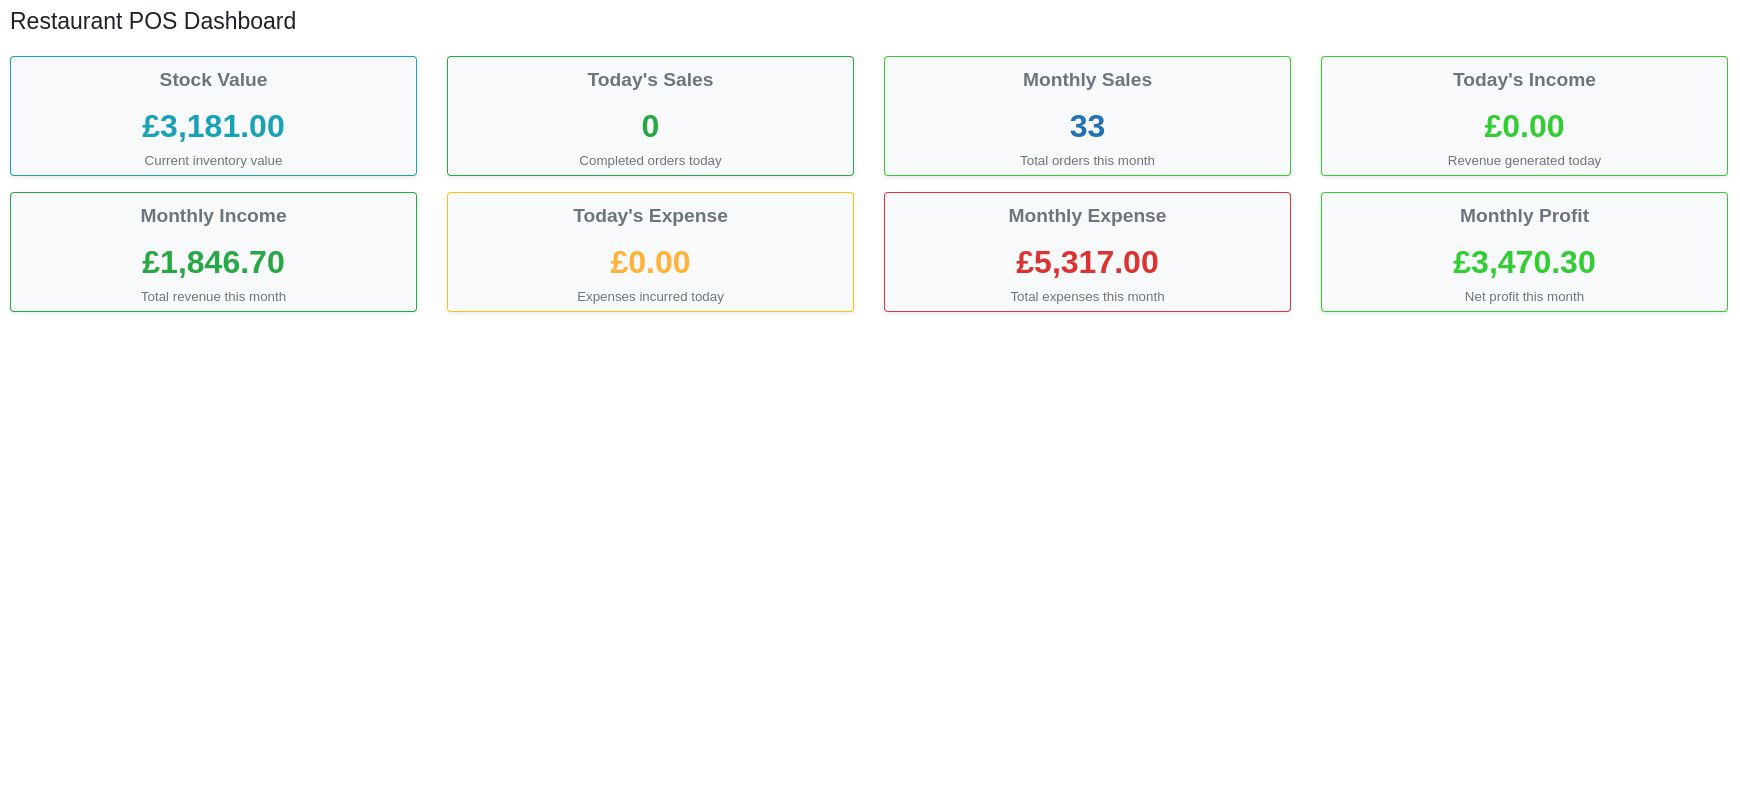
Dashboard
The dashboard provides a comprehensive overview of your restaurant's performance with real-time metrics and insights.
Dashboard Overview – Main admin dashboard displaying key business metrics and summaries
Key Metrics
| Metric | Description | Importance |
|---|---|---|
| Stock Value | Total value of current inventory | Inventory investment tracking |
| Today's Sales | Number of completed orders today | Daily performance indicator |
| Monthly Sales | Total orders this month | Monthly performance tracking |
| Today's Income | Revenue generated today | Daily cash flow |
| Monthly Income | Total revenue this month | Monthly revenue tracking |
| Today's Expense | Expenses incurred today | Daily cost monitoring |
| Monthly Expense | Total expenses this month | Monthly cost analysis |
| Monthly Profit | Net profit (Income - Expense) | Overall profitability |
Data Interpretation
- Green metrics indicate positive financial indicators
- Red metrics indicate areas needing attention
- All data updates in real-time as transactions occur
- Click any metric card for detailed breakdown
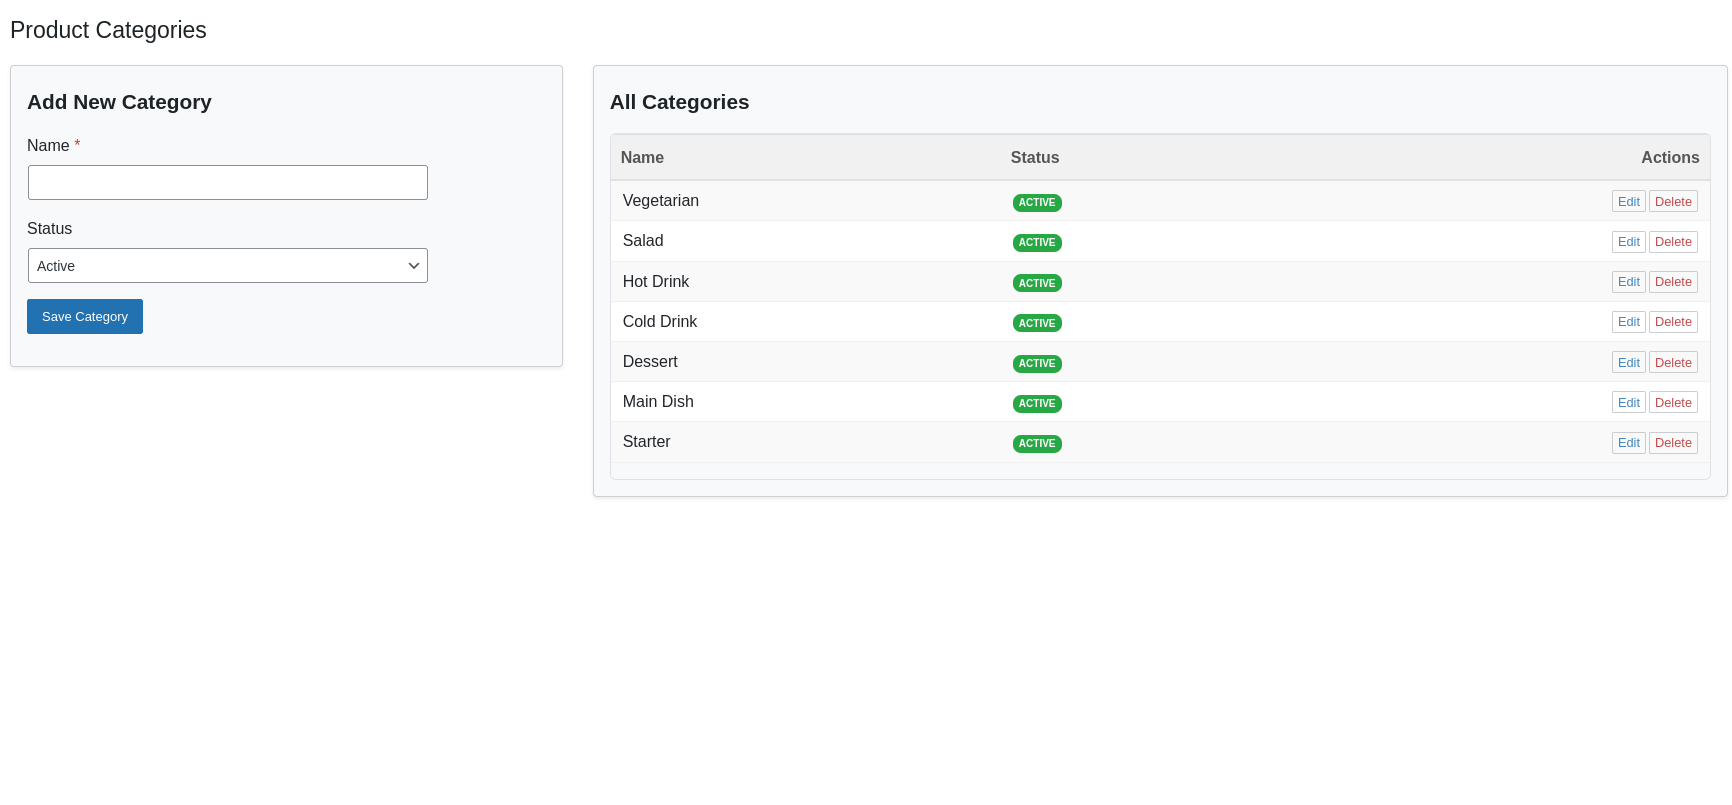
Product Categories
Organize your menu items into logical categories for better management and customer navigation.
Product Categories – Create and manage product categories for better menu organization
Creating Categories
- Navigate to OBY Restaurant POS → Categories
- Enter a category name (e.g., "Beverages", "Main Course")
- Select status (Active/Inactive)
- Click Save Category
Managing Categories
| Action | Description | When to Use |
|---|---|---|
| Edit | Modify category name or status | When menu changes or seasonal updates |
| Delete | Remove unused categories | Cleaning up old categories |
| Status Change | Activate/Deactivate categories | Temporarily hiding seasonal items |
Tips for Effective Category Management
- Keep category names short and descriptive
- Use consistent naming conventions
- Arrange categories in logical order (appetizers → main course → desserts)
- Set seasonal items to inactive when out of season
- Regularly review and update categories
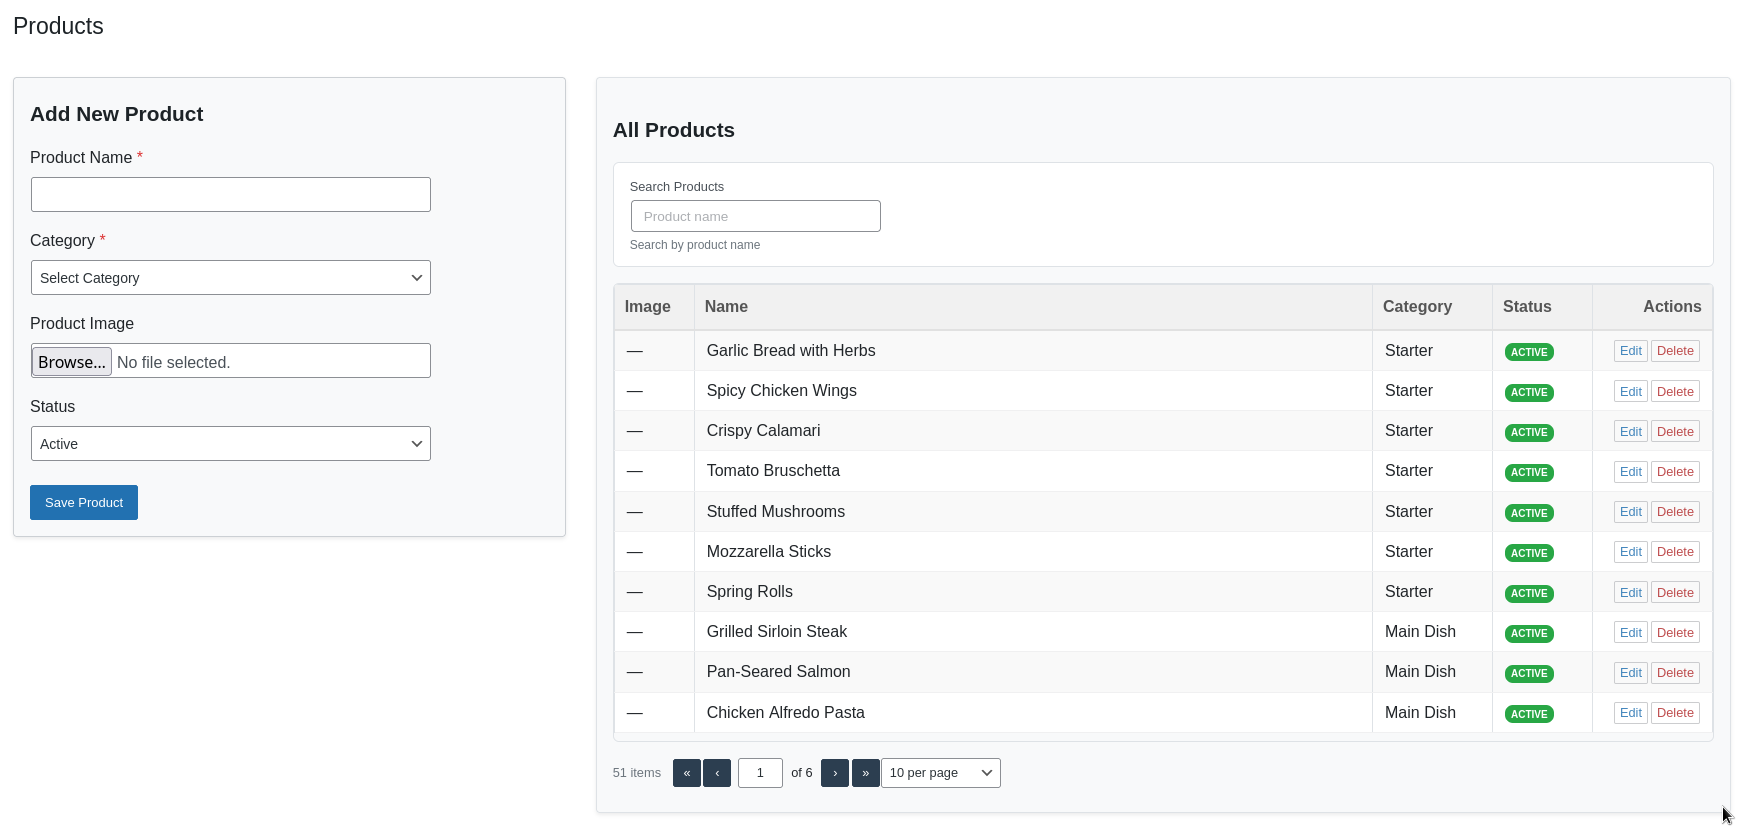
Product Management
Add and manage your restaurant's menu items with detailed information and images.
Product Management – Add, edit, and organize menu items with categories
Adding New Products
| Field | Required | Description | Example |
|---|---|---|---|
| Product Name | Yes | Name of the menu item | "Margherita Pizza" |
| Category | Yes | Product category | "Main Course" |
| Product Image | No | Visual representation | Upload pizza image |
| Status | Yes | Active/Inactive state | "Active" |
Product Images
Adding images to your products enhances the POS experience and helps staff identify items quickly.
- Recommended size: 300x300 pixels
- Supported formats: JPG, PNG, GIF
- Maximum file size: 2MB
- Images are automatically optimized and resized
Product Search & Filtering
The products table includes powerful search and filtering capabilities:
- Instant Search: Type to filter products by name
- Pagination: Navigate large product lists easily
- Status Filter: Show active/inactive products
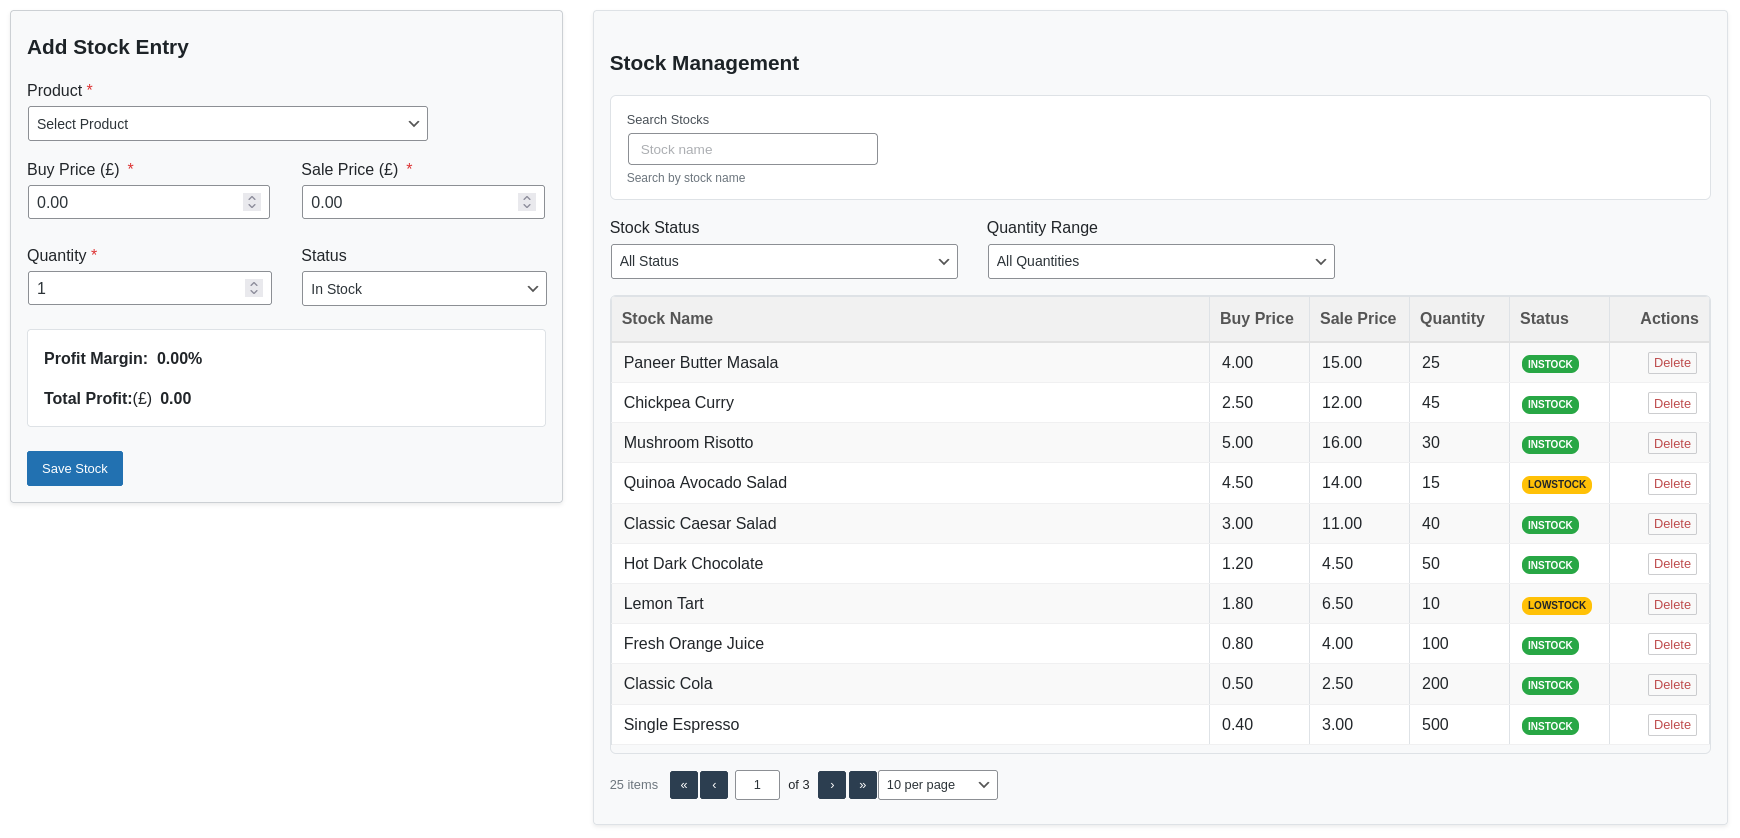
Stock Management
Track your inventory levels, costs, and availability with real-time stock management.
Stock Management – Monitor product stock levels and inventory availability
Adding Stock Entries
| Field | Required | Description | Purpose |
|---|---|---|---|
| Product | Yes | Select product from dropdown | Link stock to menu item |
| Buy Price | Yes | Cost price per unit | Calculate profit margins |
| Sale Price | Yes | Selling price per unit | Customer pricing |
| Quantity | Yes | Number of units in stock | Inventory tracking |
| Status | Yes | In Stock/Low Stock/Out of Stock | Availability indicator |
Stock Status Indicators
| Status | Color | Meaning | Action Required |
|---|---|---|---|
| In Stock | Green | Adequate inventory available | No action needed |
| Low Stock | Orange | Inventory below threshold | Consider reordering |
| Out of Stock | Red | No inventory available | Immediate reorder needed |
Profit Calculation
The stock management system automatically calculates:
- Unit Profit: Sale Price - Buy Price
- Total Profit: Unit Profit × Quantity
- Profit Margin: (Profit ÷ Sale Price) × 100
- Total Stock Value: Buy Price × Quantity
Stock Adjustments
Manually adjust stock quantities for inventory corrections, waste tracking, or special circumstances.
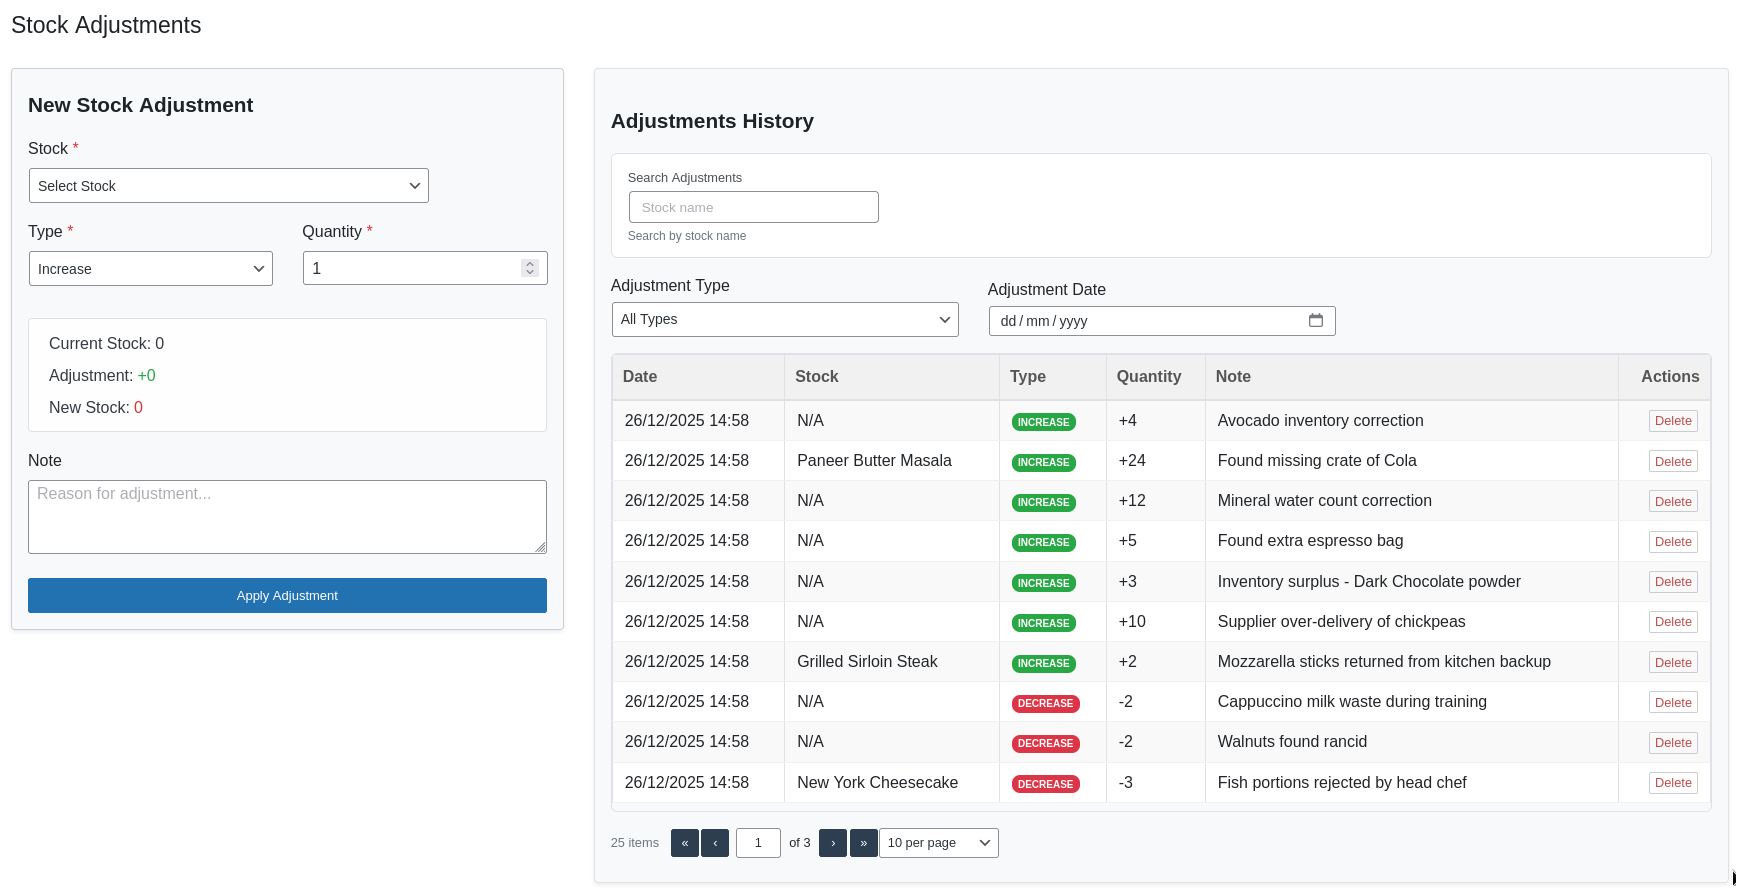
Stock Adjustment – Adjust stock quantities manually with reason tracking
Adjustment Types
| Type | Icon | Description | Common Reasons |
|---|---|---|---|
| Increase | Add stock to inventory | New delivery, production, returns | |
| Decrease | Remove stock from inventory | Spoilage, waste, damage, staff meals |
Creating Adjustments
- Select the product to adjust
- View current stock level
- Choose adjustment type (Increase/Decrease)
- Enter quantity to adjust
- Add notes explaining the adjustment
- Click Apply Adjustment
Adjustment History
All stock adjustments are logged with:
- Date and time of adjustment
- Adjustment details (type, quantity)
- Notes explaining the reason
- Stock levels before and after
Customer Management
Build and maintain a customer database for better service and marketing in future.
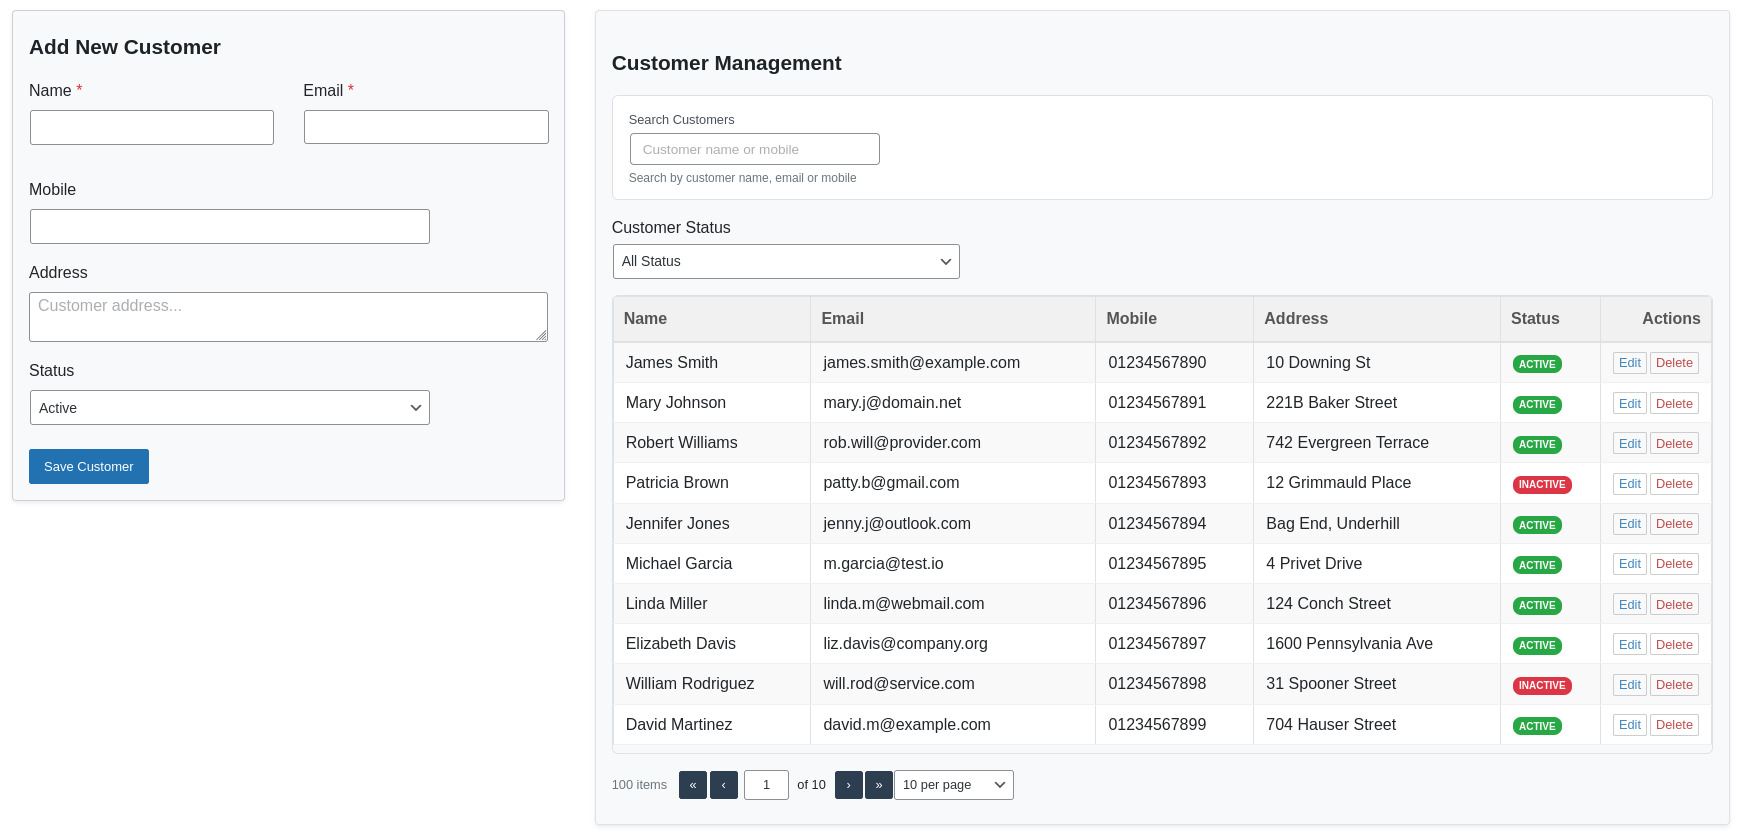
Customer Management – Manage customer records, contact details
Adding Customers
| Field | Required | Description | Best Practices |
|---|---|---|---|
| Name | Yes | Customer's full name | Use proper capitalization |
| No | Email address | Use for receipts and promotions | |
| Phone | No | Mobile number | For order updates and alerts |
| Address | No | Physical address | For delivery orders |
| Notes | No | Additional information | Preferences, allergies, special requests |
Customer Search & Filtering
Quickly find customers using:
- Name Search: Partial name matching
- Phone Search: Find by phone number
- Email Search: Search by email address
- Status Filter: Active/Inactive customers
POS System
The Point of Sale interface is the heart of your restaurant operations, designed for speed and efficiency.
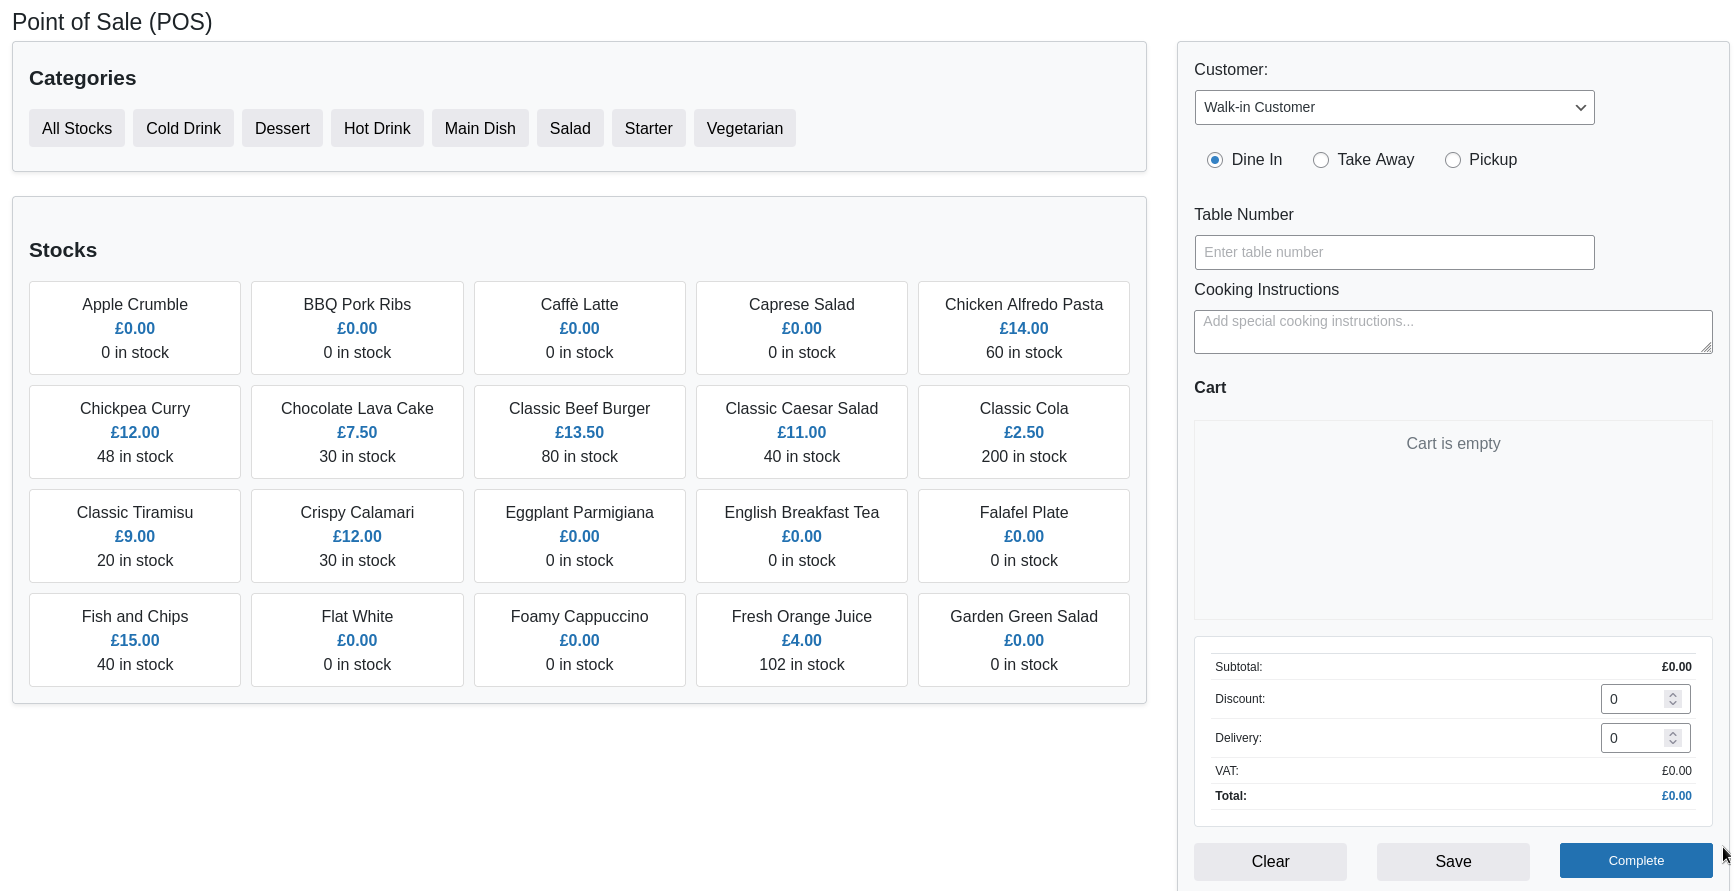
POS Interface – Point of Sale screen with product grid, cart, and order panel
Product Grid Interface
- Category Tabs: Quick navigation between product categories
- Product Cards: Visual representation with images
- Stock Indicators: Real-time availability status
Order Processing Workflow
- Select Customer: Choose existing or walk-in
- Choose Sale Type: Dine-in, Takeaway, or Pickup
- Add Products: Click items from the grid
- Adjust Quantities: Use +/- buttons in cart
- Apply Modifiers: Discounts, special instructions
- Review Totals: Check calculations
- Complete Sale: Finalize
Sale Types
| Type | Icon | Required Fields | Use Case |
|---|---|---|---|
| Dine-in | Table Number | Customers eating at the restaurant | |
| Takeaway | Customer Name, Phone | Delivery or pickup later | |
| Pickup | Customer Name | Customer collects order |
Real-time Calculations
The POS automatically calculates:
- Subtotal: Sum of all items
- Discounts: Manual or percentage discounts
- Tax/VAT: Based on configured rates
- Delivery Charges: For takeaway orders
- Grand Total: Final payable amount
Order Management Options
| Button | Action | When to Use | Result |
|---|---|---|---|
| Clear | Reset current order | Wrong order started | Empty cart, reset form |
| Save | Save order for later | Pending payment or modification | Order saved in system |
| Complete | Finalize and process | Order ready for payment | Stock updated, receipt generated |
Sales Management
Track, analyze, and manage all your restaurant's sales transactions with comprehensive reporting tools.
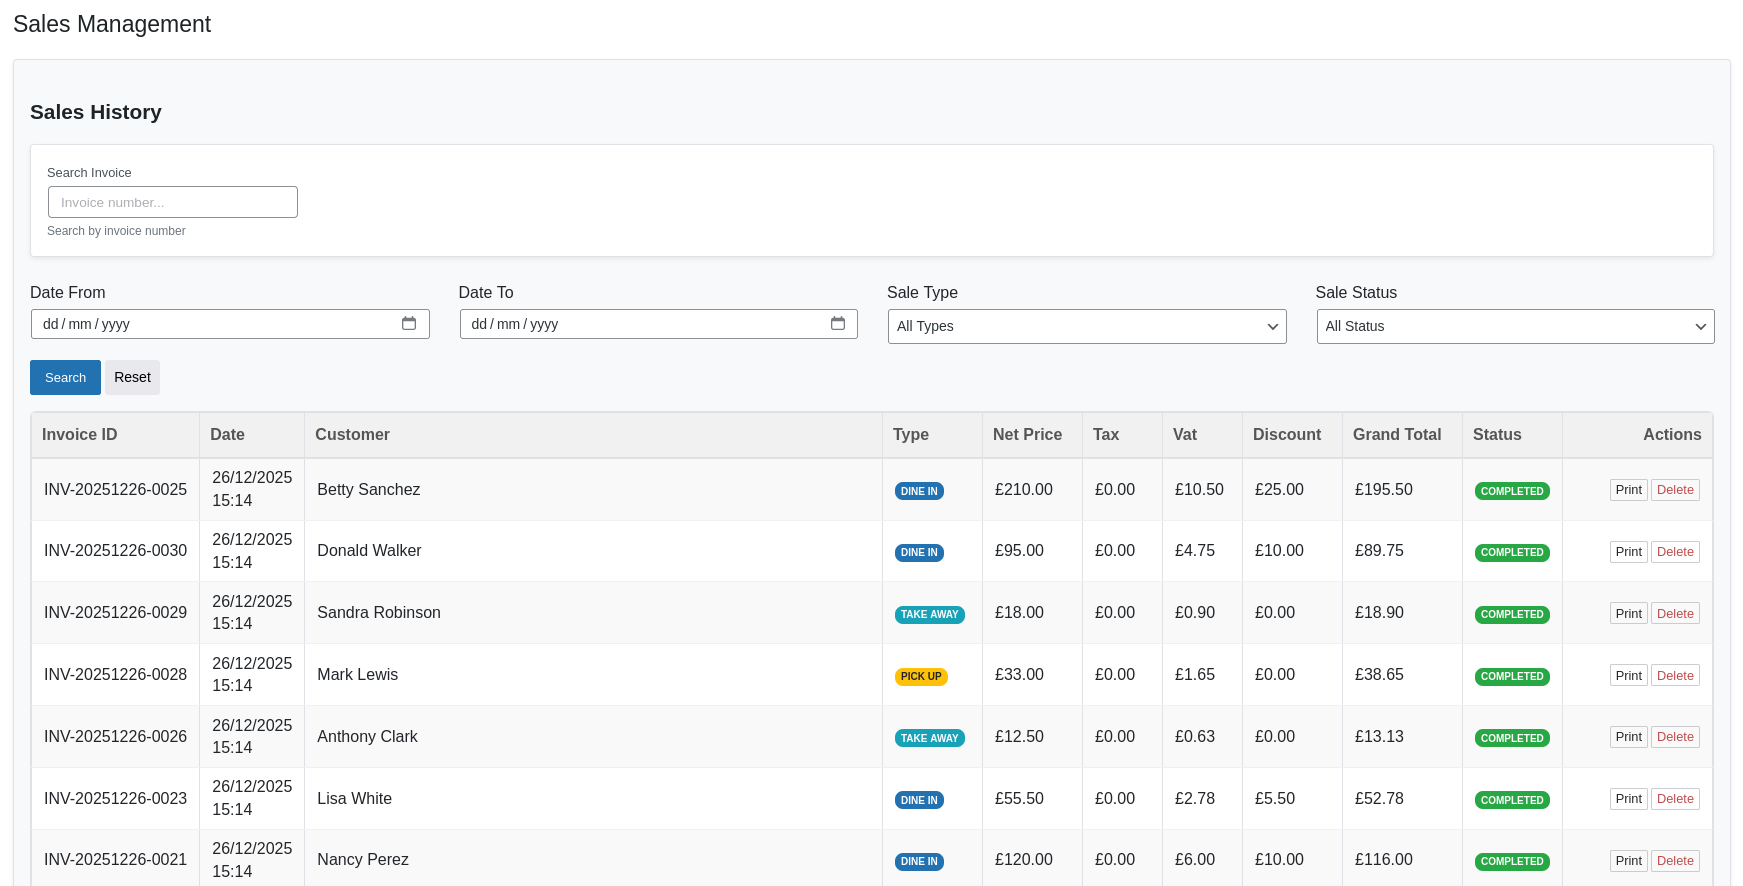
Sales History – View, search, and filter completed sales with receipt printing options
Advanced Filtering Options
| Filter Type | Options | Purpose | Business Use |
|---|---|---|---|
| Date Range | Today, Yesterday, Custom Range | Time-based analysis | Daily/Weekly/Monthly reports |
| Sale Type | Dine-in, Takeaway, Pickup | Service type analysis | Optimize service channels |
| Status | Completed, Saved, Canceled | Order status tracking | Monitor order flow |
Sales Data Columns
Each sales record includes detailed information:
- Invoice ID: Unique transaction identifier
- Date & Time: When the sale occurred
- Customer: Who made the purchase
- Items: Products purchased
- Quantities: Number of each item
- Subtotal: Before tax/discount
- Discount: Any discounts applied
- Tax/VAT: Tax amounts
- Total: Final amount paid
- Status: Current order status
Receipt & Invoice Printing
Generate professional receipts and invoices with multiple options:
| Print Type | Content | Use Case | Customization |
|---|---|---|---|
| Customer Receipt | Basic transaction details | Customer copy | Shop logo, thank you message |
| Kitchen Ticket | Order items only | Kitchen preparation | Cooking instructions, table number |
| Detailed Invoice | Full transaction breakdown | Business records | Tax details, terms & conditions |
| Summary Report | Multiple orders summary | End of day reporting | Custom date ranges, filters |
Accounting Module
Track your restaurant's financial health with comprehensive income, expense, and profitability tracking.
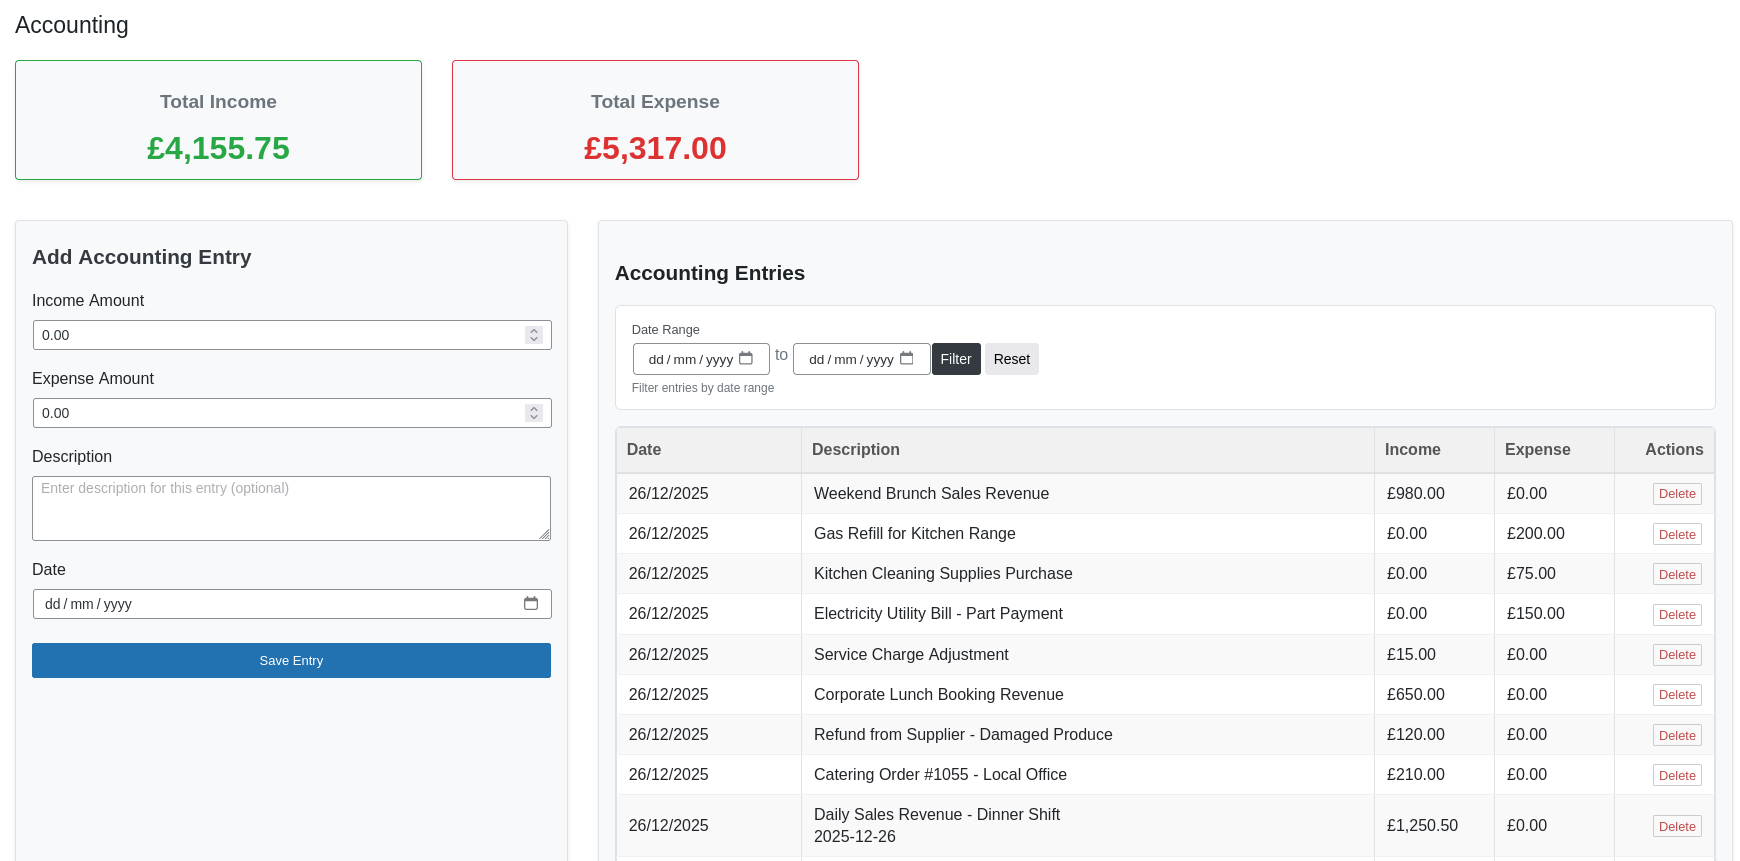
Accounting Module – Track income, expenses, and overall financial summaries
Financial Dashboard
| Metric | Calculation | Importance | Healthy Range |
|---|---|---|---|
| Total Income | Sum of all revenue | Revenue tracking | Consistent growth |
| Total Expenses | Sum of all costs | Cost control | Below 70% of income |
| Net Profit | Income - Expenses | Profitability | Positive and growing |
| Profit Margin | (Profit ÷ Income) × 100 | Efficiency measure | 15-30% for restaurants |
| Average Daily Revenue | Income ÷ Days | Performance tracking | Industry benchmark |
Expense Categories
Organize expenses for better financial management:
| Category | Examples | Typical % of Revenue | Management Tips |
|---|---|---|---|
| Food Cost | Ingredients, supplies | 25-35% | Monitor waste, negotiate prices |
| Labor Cost | Salaries, wages | 25-35% | Optimize scheduling |
| Rent & Utilities | Rent, electricity, water | 5-10% | Fixed cost, monitor usage |
| Marketing | Advertising, promotions | 3-5% | Track ROI on campaigns |
| Maintenance | Repairs, equipment | 2-4% | Preventive maintenance |
| Miscellaneous | Office supplies, fees | 1-2% | Review regularly |
Financial Reporting
Generate various financial reports:
- Daily Sales Report: End-of-day summary
- Weekly Performance: Week-over-week analysis
- Monthly P&L: Profit and Loss statement
- Quarterly Review: Seasonal performance
- Annual Summary: Year-end financials
Key Performance Indicators (KPIs)
Monitor these essential restaurant metrics:
- Food Cost Percentage: (Food Cost ÷ Food Sales) × 100
- Labor Cost Percentage: (Labor Cost ÷ Total Sales) × 100
- Prime Cost: Food Cost + Labor Cost
- Table Turnover Rate: Guests per table per day
- Average Check Size: Total Sales ÷ Number of Guests
- Sales per Square Foot: Total Sales ÷ Restaurant Area
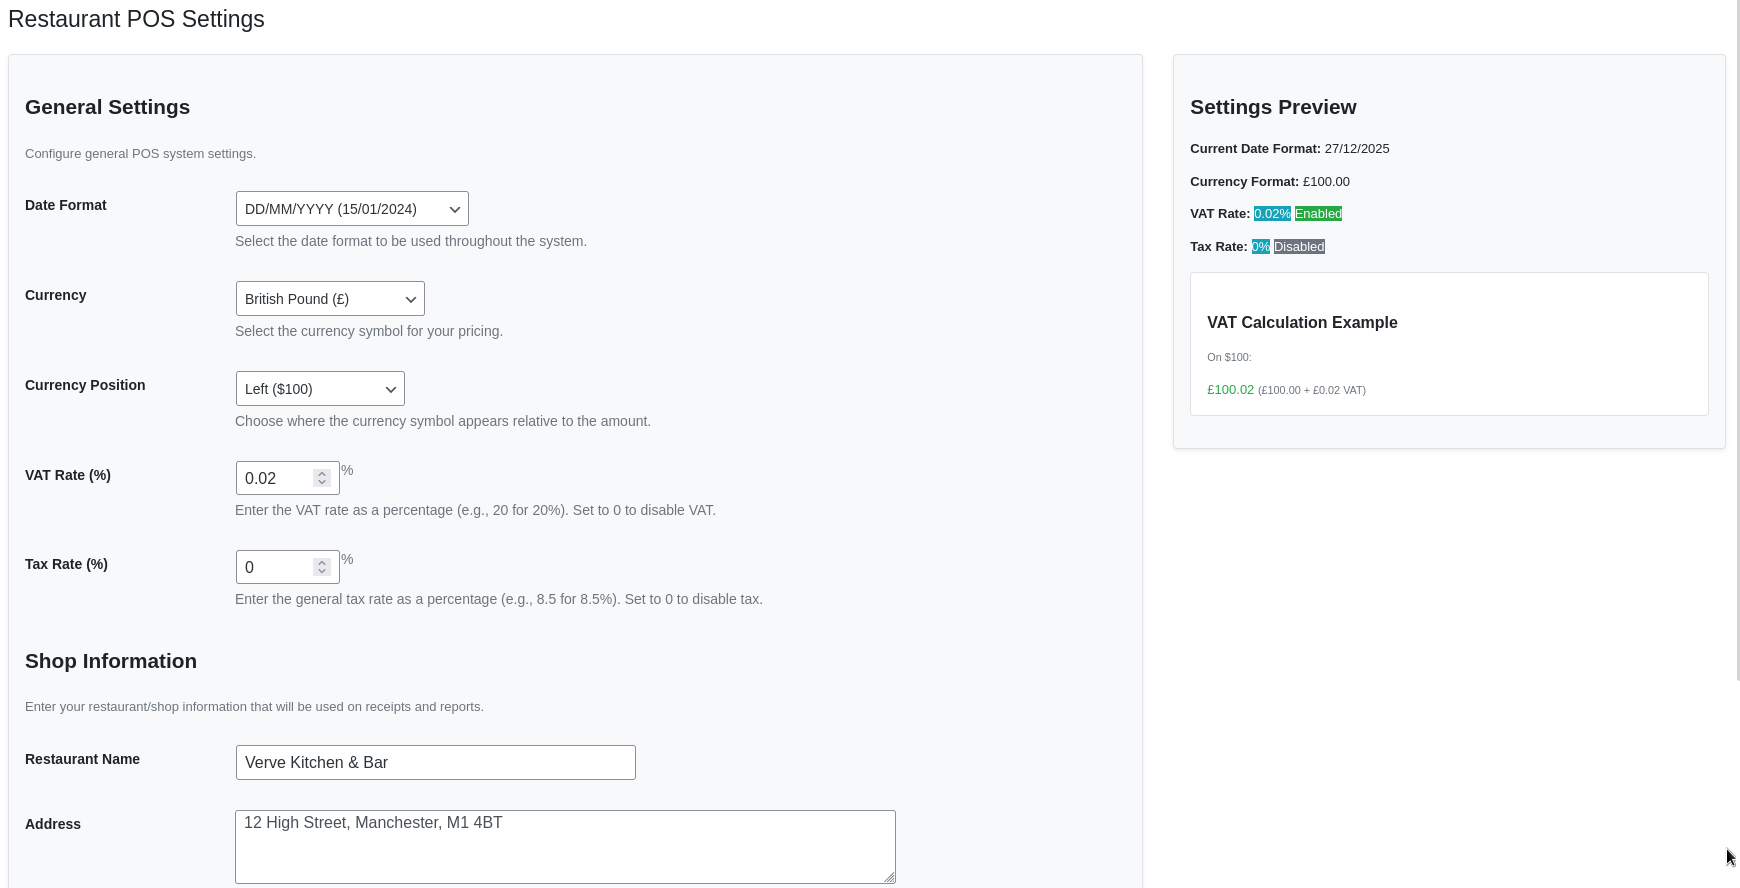
Settings & Configuration
Customize the POS system to match your restaurant's specific needs and preferences.
Settings Panel – Configure taxes, receipts, and system preferences
Shop Information
| Setting | Required | Description | Appears On |
|---|---|---|---|
| Restaurant Name | Yes | Your business name | All receipts and reports |
| Address | Yes | Business location | Receipts, invoices |
| Phone Number | Yes | Contact number | Receipts, customer communications |
Currency & Pricing
| Setting | Options | Default | Impact |
|---|---|---|---|
| Currency Symbol | $ € £ ₹ ¥ etc. | $ | All price displays |
| Currency Position | Left, Right, Left with space, Right with space | Left | Price formatting |
Tax & VAT Configuration
| Setting | Description | Default | Calculation |
|---|---|---|---|
| VAT Rate (%) | Percentage VAT rate | 0% | VAT = Subtotal × Rate |
| Tax Rate (%) | Percentage tax rate | 0% | Tax = Subtotal × Rate |
Receipt & Printing
| Setting | Options | Default | Purpose |
|---|---|---|---|
| Receipt Header | Custom text/HTML | Shop name | Top of receipt |
| Receipt Footer | Custom text/HTML | Thank you message | Bottom of receipt |
| Print Automatically | Yes/No | No | Auto-print after sale |
Date & Time
| Setting | Options | Default | Format Example |
|---|---|---|---|
| Date Format | YYYY-MM-DD, DD-MM-YYYY, MM/DD/YYYY | YYYY-MM-DD | 2024-12-15 |
Notifications & Alerts
| Setting | Description | Default | Alert Method |
|---|---|---|---|
| Low Stock Alert | Notify when stock is low | Enabled | Dashboard warning |
| Alert Threshold | Quantity for low stock alert | 10 | Customizable |
| Daily Sales Report | Email end-of-day report | Disabled | Email notification |
| New Order Sound | Play sound for new orders | Enabled | Browser notification |
| Print Sound | Play sound when printing | Enabled | Browser notification |
Security Settings
| Setting | Description | Default | Security Level |
|---|---|---|---|
| User Roles | Who can access POS | Administrator only | High |
| Password Protection | Require password for voids | Enabled | Medium |
| Session Timeout | Auto-logout after inactivity | 30 minutes | Medium |
| IP Restriction | Allow specific IPs only | Disabled | High |
| Audit Log | Log all transactions | Enabled | Medium |
Frequently Asked Questions
Installation & Setup
A: Yes, Obydullah Restaurant POS Lite is completely free with all core features included.
A: WordPress 5.0+, PHP 7.4+, MySQL 5.6+. See the System Requirements section for details.
A: Yes, the plugin works with any WordPress theme. It uses its own admin interface.
POS Operations
A: In the POS interface, enter discount amount or percentage in the discount field before completing the sale.
Inventory Management
A: Yes, the POS automatically checks stock levels and prevents sales when items are out of stock.
A: Use the Stock Adjustments feature to decrease stock quantities and add notes explaining the reason.
Reporting & Analytics
A: Yes, use the date range filters in the Sales section to compare performance across different time periods.
Receipt & Printing
A: Any standard thermal receipt printer (Epson, Star, etc.) that works with Windows printers.
Troubleshooting
Common Issues
| Issue | Possible Cause | Solution |
|---|---|---|
| Plugin not installing | PHP version too old | Upgrade to PHP 7.4 or higher |
| Database errors | MySQL version incompatible | Upgrade to MySQL 5.6 or higher |
| POS not loading | JavaScript conflicts | Deactivate other plugins to test |
| Slow performance | Large database or low memory | Increase PHP memory limit to 256MB |
| Printing issues | Printer not configured | Check printer settings and drivers |
| Stock not updating | Cache issues | Clear browser and server cache |
Maintenance Tips
- Regular Backups: Always backup your database before updates
- Clear Cache: Clear browser cache if experiencing display issues
- Update Regularly: Keep WordPress and plugins updated
- Monitor Logs: Check error logs for troubleshooting clues
- Test Updates: Test updates on staging site first
- Clean Database: Archive old sales data periodically
Support & Resources
Getting Help
| Resource | Description | Best For | Response Time |
|---|---|---|---|
| WordPress.org Forums | Official support forum | General questions, installation help | 1-3 days |
| GitHub Issues | Bug reports and feature requests | Technical issues, suggestions | 2-5 days |
| Documentation | This documentation site | Self-help, tutorials, guides | Instant |
Additional Resources
- Video Tutorials: Step-by-step video guides
- User Guide: Comprehensive PDF manual
- API Documentation: For developers and integrators
- Community Forum: User discussions and tips
- Blog: Tips, updates, and announcements
Community Support
Join our community for additional support:
- Share Tips: Learn from other restaurant owners
- Feature Requests: Suggest new features
- Bug Reports: Help improve the plugin
- Translations: Help translate the plugin
- WordPress version
- PHP version
- Plugin version
- Error messages (if any)
- Steps to reproduce the issue